About Hoverdesk Popup Menus
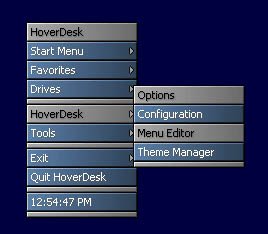
Hoverdesk can replace your Windows Start menu with a fully customizable "pop-up" menu. You can create and specify custom images for this menu. You can add Windows commands, all your favorite folders and drives and a whole lot more.

Using the menus:
To access a fixed button menu, simply click on the Menu tile and the default Root Menu will appear. Operation is much like the stardard Windows Start Menu. Click on the folder you wish to expand or the command you wish to run. Folders with subdirectories are indicated by an "arrow" image. You can create new Menu Tiles and have different menu content for each one by customizing the menu contents. You can also modify the appearance of your Start Menu.
To access the pop-up menu, Right Click anywhere on your desktop and the menu will appear. A Left Click will hide this menu. You can customize the contents of the pop-up menu to include different entries that the "Menu Button" menus.
NOTE: To access the pop-up menu, you must have "Hide Desktop Icons" enabled in the HoverDesk General Configuration.
The start menu will automatically hide after selecting a file or program.
Left Click on the Top bar will scroll down the menu content
Right-Click ... will scroll up the menu content
Double-Click on the Top bar will close all submenus
Double-click on a Dir entry in the menu/submenu will open that
Dir
SHIFT+Left click & move will move the menu/submenu
Task Menu: NEW
You may use a special feature of the HoverDesk menu to access your running tasks. Simply Middle Click anywhere on the desktop (other than an existing HoverDesk tile) and you'll see your active and inactive tasks displayed in a menu like form. You may also CTRL+SHIFT+left click over any window, if the open Windows obscure the desktop. Highlight the task you want to change to, and click to change tasks.
Customizing the menu contents:
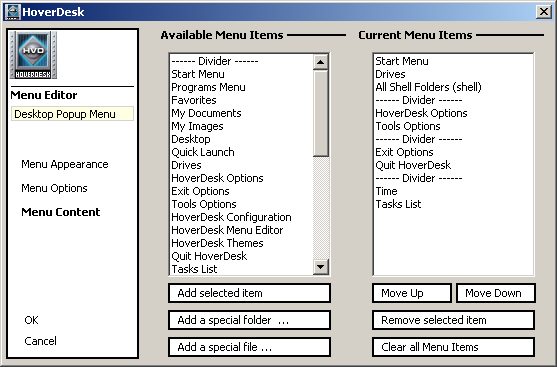
You can easily customize both the pop-up menu and the menus on fixed menu tiles by using the Menu Editor. You can select from the list of stock menu commands or add a specific file or directory. To add a selection from the stock commands, simply highlight the desired command and click the Add Selected Item button. To add a path (directory), click the Add a Special Folder button and browse to your desired directory. To add a specific File or Application, click the Add a Special File button and browse to your desired file or .exe.
You may position or delete items within a popup menu by using the right panel and selecting the appropriate button. Menu items may also be dragged within the Current Menu Items list and position by dragging and dropping them where you wish.
Tip: if you delete all your Menu Items list (Menu Editor), HoverDesk will re-create a standard new one.
Customizing the menu appearance and operation:
You can alter the appearance of your custom Start Menu. To do this, You'll create images for the Top, Middle, Middle (Hilite), Spacer, Bottom and the Arrow image. Image transparency is supported using RGB 255,0,255 as the transparent color. You assign these images by using the General Settings Tab of the HoverDesk Menu Editor.
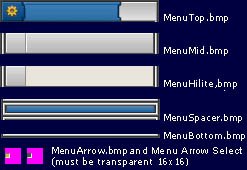
Assigning
the images and configuring the menu:
Use the browse fields to select the menu images you have created.
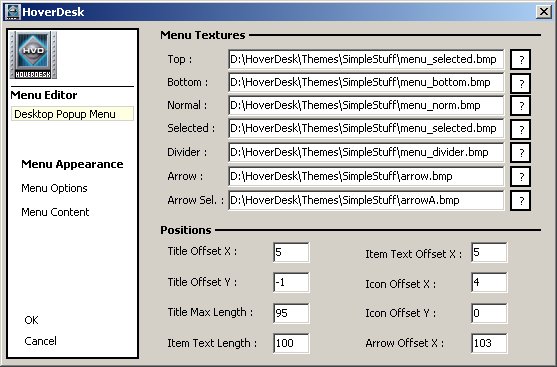
Positions:
Title Offset X: The number of pixels relative to the left, the Menu Title
text is offset. (-1 = Centered)
Title Offset Y: The number of pixels relative to the top, the Menu Title
text is offset. (-1 = Centered)
Title Max Length: Number of pixels limiting the display of a Menu Title.
Item Text Length: Number of pixels limiting the display of a Menu Item text
description.
Item Text Offset X: The number of pixels relative to the left, the MenuItem
text is offset. (-1 = Centered)
Icon Offset X: The number of pixels relative to the left, the Menu Icons
are offset.
Icon Offset Y: The number of pixels relative to the top, the Menu Icons
are offset.
Arrow Offset X: The number of pixels relative to the left, the Arrow Images
are offset.
Menu Options:
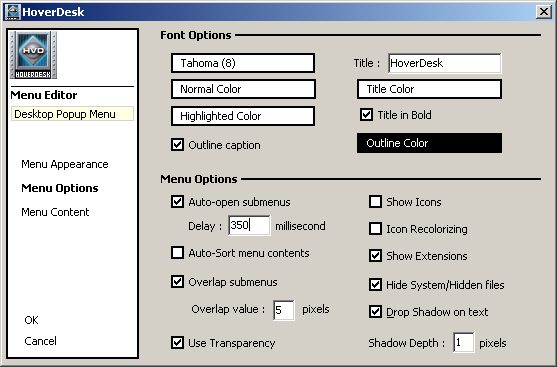
Font Options:
Here, you can specify the menu font, the title text, the color and the Hover color.
Menu Options:
Auto Open Submenus: This option enables or disables the automatic opening of
submenus (like Windows) or if left unchecked, requires you to click on a menu selection to
expand the submenu.
Delay: Specify a menu opening delay time.
Auto Sort Menu Contents: This option enables or disables alpha sortation of the menu
contents (Recommended)
Overlap Submenus: Enable and specify a value for menu overlap to optain
certain visual effects.
Use Transparency: This option enablesor disables transparent menu
images where you have included transparent (RGB 255,0,255) areas.
Show Icons: This option enables or disables the display of 16x16 pixel
icons within the menus.
Show Extensions: This option enables or disables the display of the path and
file extensions within the menu (not recommended)
Hide System / Hidden Files: This option enables or disables the display of hidden files
within the menu contents (Recommended)
Drop Shadow on Text: This option enables or disables the display drop shadow
text effects on menu item text. You may specify an offset value.
Drop Shadow Depth: Defines the visual depth of the shadow effect.
Creating New Fixed Menu Tiles:
Create a Tile as you would create any other new tile. When you assign the Tile Properties, Select Hoverdesk Popup Menu as the Application Type. Then specify the menu contents within the Menu Editor..